How to Build a Pull-behind Lawn Sprayer is a must learn to save your time and money. A healthy and tidy lawn is a prior desire for every gardener. Whether you have a small garden or a large piece of land, it is expected that you maintain it properly. There are sufficient lawn care tools that can make your task easier.
Lawn sprayer is one among them. A manual lawn sprayer is a much more hectic and time-wasting equipment. Instead, a customized Pull-behind lawn sprayer is a better option as a useful one.
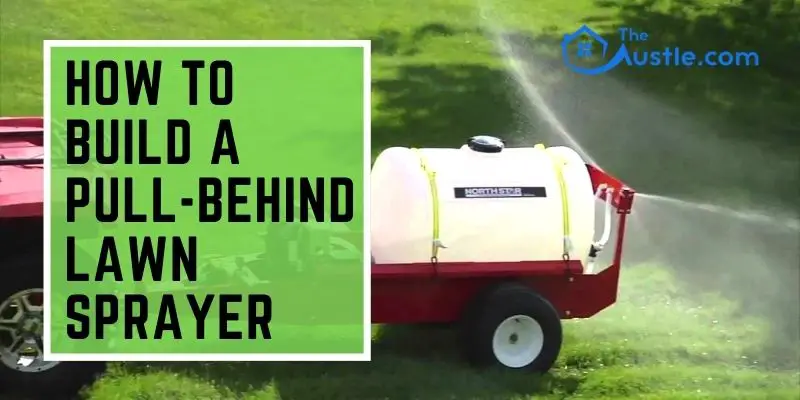
Generally, pull-behind lawn sprayers are functioned to distribute herbicides, pesticides, and fertilizers in precise space or larger areas. For a specific application, this sprayer comes with a simple spray hose that can reach to nukes and corners easily.
In broader areas, gardeners use a comparatively costly and complicated sprayer which is hardly easy to carry.
We can provide you an easy step by step method on how to build a Pull-behind lawn sprayer.
How To Build A Pull-Behind Lawn Sprayer
How to build a Pull-behind lawn sprayer is not a tough job if you work accordingly. Good preparation will definitely get your job half done. Do not hesitate to spend sufficient time on calculating your time and cost for the respective job.
- It is better to make a draft sketch containing approximate measurements of connecting tools. You can do this before collecting the necessary tools or you can do it later. Try to be as precise as you can. Do not design it complicated with lots of screws, pipelines, and valves. Make it easy to operate and repair.
- Be rational in choosing your components. If you want to make it cheaper and handy then this planning is worthy of your time. For instance, you can choose light PVC materials instead of metal ones if it serves the purpose as well.
- Try to gather your components from local firm markets. Available products are more reliable. You can easily exchange, replace, and reform it within a reasonable cost.
- Do not forget to wear and use safety equipment. Use goggles, gloves, and protective shields while you work with electric lines and flammable objects.
- You can select any tractor, wagon, or trolley for installation. You need to take a tank supposedly of 12-15 gallon capacity, a five-gallon pump, and an inline strainer, pressure relief valve with PSI gauge, nozzles, a drilling machine, Teflon tape, battery, pipes, strainer, and screw.
Step:1 Drill on the Top of Your Tank
Take your tank and make sure it is leak proof. Drill on the top of it to install the pump at first. You should try to drill towards the center. So that you can easily fit nuts and screw underside of the fitting.
Step:2 Install Your Pump
Take your 60 gallon PSI pump. It should be capable of 5.5 gallons per minute discharge. Place it on the corner of the tank. Fit these nuts inside the tank located under the pump through the cap. Put on washers and screws to complete the process.
Step:3 Set on The Pressure Relief Valve
Drill on the top nearby pump for bulkhead fitting. The pressure relief valve is situated on it. This valve will regulate the force coming out of the nozzle. Fix the pressure gauge facing towards the operator, so that the operator can observe the pressure level while using the sprayer.
It has two ways of pipelines. The inward line will pass excess water to the tank and the outward line will pass water to the boom.
Step:4 Mount on The Inline Strainer
Put on the inline strainer near the cap. It will strain out toxic particles before they pass through the pump. Install the feeder tube inside the tank. Now the outer tube of the strainer will be facing towards the pump.
Step:5 Use Teflon Tape on Threaded Connections
It is important to use Teflon tape to avoid any leakage. Make sure to wrap up all lines with Teflon tape.
Step:6 Connect Hose Lines
Hook up the hose lines with stainless steel clamps. The intake line will pass through the filter of the pump. The pressure relief valve will regulate the correct measure of liquid flow. The valve will release excess water back down to the tank. The outer hose will send water to the boom.
A quarter-turn ball valve is installed to fix the ratio of the mixture. If it is turned off then water will not go to the boom.
Step:7 Place The Tank
The tank should have a flat bottom. You can use thin iron threads to pull up the tank in such a height that the weight of water sets up at the bottom. Place the iron threads horizontally with screws. Now place the tank over it.
Step:8 Build The Boom and Adjust Nozzles
Use the extended part of iron threads popping out from the bottom of the tank. Take a 100 inches pipe and put on five nozzles at 20 inches gap from each. Attach sufficient hose pipes with nozzles. Put on a 90-degree ball valve between each nozzle.
This valve can control and shift the pattern of water flow between wider and narrower. You can use wing nuts with wing knobs to easily remove the long boom anytime.
Step:9 Attach Battery
Attach your power source behind the wagon on a bar. Make sure it does not touch any other parts to accept the trolley. Fit an angled aluminum bar in front of it as a protective part. Now hook up the electrical lines.
Give the connection from the battery to the switch situated on the handle. Hook up the pump for electrical connection and follow the diagram if you need it.
Step:10 Power Supply
Take a soldering iron, shrink wrap tube, and flux to prepare the line. Hit up your soldering iron just a bit. Dab some flux on shrink wrap tube, take a small amount of solder, and put it on the wire with a hot soldering iron. The wire would take melted solder into it.
Put on a small heat shrink tube over it and use a heat gun to fix it. Now the connection will be tightened up. Adjust all the wire lines with the pump and switch with hooks. You can make a flexible plug option through the extra wire.
In this way, you can pull out your entire sprayer tank without breaking anything. Solder the connection line with the main switch and check it. Finally, you have done it.
Conclusion
How to build a pull-behind lawn sprayer is certainly an enjoyable feature to you. Lawn care is an inevitable task if you owe a piece of land. Generally, people are passionate about a good looking vineyard. But time and money consuming efforts often hinder their path.
Available lawn sprayers are almost expensive and complicated to operate to some. Therefore if you are enthusiastic and have little knowledge of such mechanisms, try it. You can save your money, time and can boost up your creativity.